
 09850840410
 lomelt@yahoo.co.in
09850840410
lomelt@yahoo.co.in

| 1. Joint Design | 2. Pre Cleaning |
| 3. Fluxing The Parts | 4. Assembly For Brazing |
| 5. Heating The Joint And Applying The Filler Alloy | 6. Cleaning The Brazed Joints |
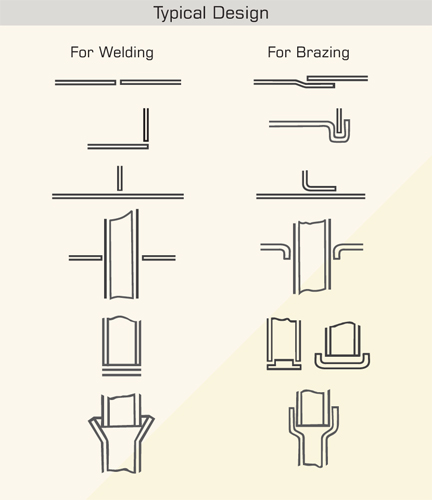 1. Joint Design: {Drawing} A Comparison Of The Different Joint Designs Used In Welding And Brazing Is Shown Below:
The Most Common Type Of Joint Used In Brazing Is The Lap Joint In The Case Of Tubular Components. To Desing A Good Lap Joint, Two Criteria Should Be Considered: A. The Joint Gap B. The Degree Of Overlap. It Is This Two Parameters Determine The Ultimate Joint Strength, And Not The Properties Of The Filler Metal. The Joint Clearence Between Parts Should Not Be Too Tight Nor Shouls Be Too Loose. An Optimum Clearence Is About 0.4 Mm.
1. Joint Design: {Drawing} A Comparison Of The Different Joint Designs Used In Welding And Brazing Is Shown Below:
The Most Common Type Of Joint Used In Brazing Is The Lap Joint In The Case Of Tubular Components. To Desing A Good Lap Joint, Two Criteria Should Be Considered: A. The Joint Gap B. The Degree Of Overlap. It Is This Two Parameters Determine The Ultimate Joint Strength, And Not The Properties Of The Filler Metal. The Joint Clearence Between Parts Should Not Be Too Tight Nor Shouls Be Too Loose. An Optimum Clearence Is About 0.4 Mm.
2. Pre Cleaning: All Grease, Rust Or Plain Dirt Must Be Throughly Removed Chemically Or Mechanically. Mecanical Removal Is Preferable Because The Surface Is Roughened, And Excellent Bonding Is Obtained. Oil And Grease Removal Is Best Carried Out Using A Solvent Degreasing Agent.
3. Fluxing The Parts: Apply Paste Flux With A Brush On Joint Surface And Filler Alloy Before Heating. This Will Prevent Oxidation Of Parts During Heating Resulting In Free Flow Of Brazing Filler Metal. A Flux Powder Should Be Mixed To A Creamy Consistency With Water And Few Dropes Of Detergent.
4. Assembly For Brazing: Parts Should Be Securely Held In Position (Proper Jig And Fixture) During Brazing.
5. Heating The Joint And Applying The Filler Alloy: When Heating A Joint For Brazing It Is Essential That It Is Slowly And Evenly Heated To The Brazing Temprature. Apply Brazing Alloy When The Flux Is Molten. Continue Heating Until The Molten Filler Alloy Smoothly Flows Around Joint Surface.
6. Cleaning The Brazed Joint: After Brazing Clean Flux Residues From Brazed Joint By Soaking And Then Brushing Under Hot Water. When Alloy Is Solidified The Joint Can Be Quenched In Water To Help Remove Flux Residues. Quenching Should Only Be Carried Out When It Will Not Damage The Properties Of The Parent Metal Or Cause Cracking Because Of Stresses Caused By The Thermal Shock.